
Deploy to thousands of devices simultaneously.
Mobile Eye is available through Google Play for devices, including Google TVs. Just search for the 7SIGNAL Mobile Eye app.
7SIGNAL has enabled Android Enterprise Managed Configuration for Mobile Eye and this is the preferred path for deployment because it allows you to auto-grant app permissions and set parameters through your MDM/EMM system. Check to see if your system has the following capabilities:
- Integrated with Android Enterprise and Google Play
- Ability to auto-grant permissions to apps
- Can use managed configuration features to set Organization ID and Device Name
- Ability to auto-start the app
7SIGNAL has provided instructions for deploying to Android devices using Workspace ONE and SOTI MobiControl. If you use a different MDM/EMM system, then contact 7SIGNAL to review the capabilities and limitations of the system.
Permissions
Location services must be turned "on" for your devices.
Then, with your MDM/EMM system, you should be able to auto-grant all the required permissions below at time you obtain the app from Google Play.
- Get accounts - to associate results with a device's account
- Contacts (read) – to associate results with a device’s host name
- Location access (fine) – to detect if there is a better access point close by
- Location access (background) - to detect other AP's while running in the background
- Storage – to check its configuration file
- Post Notifications - to indicate that the service is running
Some MDM/EMM systems may require an XML file encoded with the required permissions. If needed, please use the XML below.
<characteristic uuid="ece876fd-da7d-424f-9bab-85a1b483e95d" type="com.airwatch.android.androidwork.permissions" target="1">
    <parm name="MasterRuntimePermission" value="1" type="integer" />
    <parm name="AppLevelRuntimePermissions" value="W3sicGFja2FnZU5hbWUiOiAiY29tLnNldmVuc2lnbmFsLk1vYmlsZUV5ZUVudCIsICJwZXJtaXNzaW9ucyI6IFt7Im5hbWUiOiAiYW5kcm9pZC5wZXJtaXNzaW9uLklOVEVSTkVUIiwgInZhbHVlIjogIjEifSwgeyJuYW1lIjogImFuZHJvaWQucGVybWlzc2lvbi5HRVRfQUNDT1VOVFMiLCAidmFsdWUiOiAiMSJ9LCB7Im5hbWUiOiAiYW5kcm9pZC5wZXJtaXNzaW9uLkFDQ0VTU19ORVRXT1JLX1NUQVRFIiwgInZhbHVlIjogIjEifSwgeyJuYW1lIjogImFuZHJvaWQucGVybWlzc2lvbi5SRUFEX1BIT05FX1NUQVRFIiwgInZhbHVlIjogIjEifSwgeyJuYW1lIjogImFuZHJvaWQucGVybWlzc2lvbi5XUklURV9FWFRFUk5BTF9TVE9SQUdFIiwgInZhbHVlIjogIjEifSwgeyJuYW1lIjogImFuZHJvaWQucGVybWlzc2lvbi5GT1JFR1JPVU5EX1NFUlZJQ0UiLCAidmFsdWUiOiAiMSJ9LCB7Im5hbWUiOiAiYW5kcm9pZC5wZXJtaXNzaW9uLkFDQ0VTU19CQUNLR1JPVU5EX0xPQ0FUSU9OIiwgInZhbHVlIjogIjEifSwgeyJuYW1lIjogImFuZHJvaWQucGVybWlzc2lvbi5BQ0NFU1NfRklORV9MT0NBVElPTiIsICJ2YWx1ZSI6ICIxIn0sIHsibmFtZSI6ICJhbmRyb2lkLnBlcm1pc3Npb24uQUNDRVNTX1dJRklfU1RBVEUiLCAidmFsdWUiOiAiMSJ9LCB7Im5hbWUiOiAiYW5kcm9pZC5wZXJtaXNzaW9uLkNIQU5HRV9XSUZJX1NUQVRFIiwgInZhbHVlIjogIjEifSwgeyJuYW1lIjogImFuZHJvaWQucGVybWlzc2lvbi5XQUtFX0xPQ0siLCAidmFsdWUiOiAiMSJ9LCB7Im5hbWUiOiAiYW5kcm9pZC5wZXJtaXNzaW9uLlJFQ0VJVkVfQk9PVF9DT01QTEVURUQiLCAidmFsdWUiOiAiMSJ9XX1d" type="string" />
</characteristic>
Privacy
Starting with Android 11, MAC addresses are no longer provided by the OS to applications, like Mobile Eye. Therefore, to uniquely identify devices, 7SIGNAL will assign an ID as the device hostname by default. However, if your EMM system allows, use the Android Enterprise Managed Configuration feature to assign device names. More information is below.
Also starting with Android 11, apps like Mobile Eye are no longer allowed to write to the SD card. Therefore, you must use the Android Enterprise Managed Configuration features to push your organization ID to devices. More information is below.
SOTI MobiControl
- Create a profile configuration to contain the "high accuracy location permission" which is required by 7SIGNAL Mobile Eye to obtain SSID and BSSID information.
- Go to Profile Configuration > Restrictions > Feature Control > Location Accuracy
- Select the High Accuracy option, click Save, then Assign to the device group.
Managed Configuration
7SIGNAL has enabled Android Enterprise Managed Configuration for Mobile Eye. This allows you to set certain properties through your EMM system:
- Organization ID (your 7SIGNAL tenant identifier)
- Device Name (assigned and listed in your EMM system)
- Enable Support Control (shows controls in the user interface that technical support might use for troubleshooting).
- If the app is managed by an EMM system (e.g. Workspace ONE), then the following controls will be hidden on the Mobile Eye Android app user interface by default: “Auto-start on Boot”, “Verbose Logging” and “Share Agent Logs”.
- The controls are hidden by default to prevent device users from inadvertently toggling the features on or off.
- To show or activate these controls so that they appear in the app's user interface, use the Android Enterprise Managed Configuration features within your EMM system to set the parameter named Enable_Support_Control to TRUE.
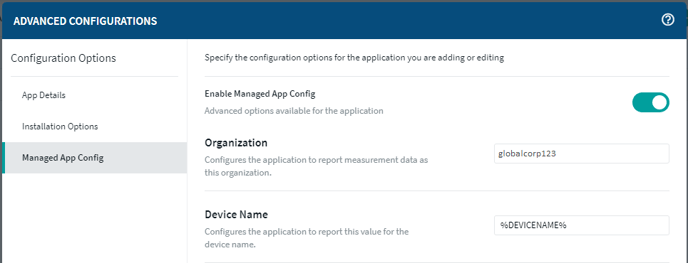
Go to 'Create App Policy' then 'Advanced Configurations' to enable 'Managed App Config. Here, you may specify your organization ID and device name. See example below.
You can send a script to devices to start the Mobile Eye app after install. However, if the device is locked-down in a "kiosk mode" then the command may not get through. You should be able to temporarily whitelist the 7SIGNAL app, push the start intent, then remove from the whitelist if you do not want your users to see the app.
« start com.sevensignal.MobileEyeEnt »
Package Studio (only use with Android 10 and below)
- Build a package with SOTI's Package Studio.
- From 7SIGNAL, get the current APK and a configuration file containing your organization ID. The configuration file will be written to the device's SD card (not supported with Android 11 and higher).
- When building the package, indicate that you want to start the app after it is installed.
- Add a 'reset' post-install script to your package. If you don't then the device may need to be rebooted for the app to start.
- Load the package into a profile.
- Assign the profile to the device group.
VMWare's Workspace ONE
Instructions are only applicable for devices in Work Managed Device Mode. Additionally, Location Services must be turned on each device. Go to Devices → Profile → Launcher → Restrictions → Location Services to enable it for your devices in Workspace ONE.
Managed Configuration
7SIGNAL has enabled Android Enterprise Managed Configuration for Mobile Eye. This allows you to set certain properties through your EMM system:
- Organization ID (your 7SIGNAL tenant identifier)
- Device Name (assigned and listed in your EMM system)
- Enable Support Control (shows controls in the user interface that technical support might use for troubleshooting)
- If the app is managed by an EMM system (e.g. Workspace ONE), then the following controls will be hidden on the Mobile Eye Android app user interface by default: “Auto-start on Boot”, “Verbose Logging” and “Share Agent Logs”.
- The controls are hidden by default to prevent device users from inadvertently toggling the features on or off.
-
- To show or activate these controls so that they appear in the app's user interface, use the Android Enterprise Managed Configuration features within your EMM system to set the parameter named Enable_Support_Control to TRUE.
Once you obtain Mobile Eye from Google Play, then with Workspace ONE use the ‘Application Configuration’ option, then add an ‘Assignment’ where you can modify the Organization ID and the device name. Go to:
Restrictions → Managed Access
Distribution → App Delivery Method → Auto
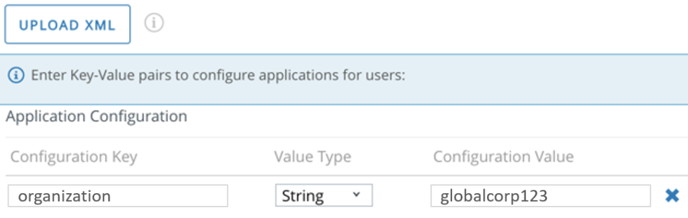
Application Configuration
You should see the Configuration Keys, for organization and device name
The organization ID is given to you by 7SIGNAL and may be found in your welcome email.
The Value Type = string.
For device name, you may use a variable, such as {DeviceFriendlyName}
Adding the Organization ID - 2nd method
Alternatively, you can add a device profile and add it to assigned device groups.
- Go to DEVICES → Profiles & Resources → Profiles
- On the General tab, give this profile the name 7SIGNAL Mobile Eye Org ID
- On the Custom Settings tab, add the following:
<characteristic type="com.airwatch.android.androidwork.app:com.sevensignal.MobileEyeEnt" uuid="568bc89d-1df8-

4ce9-a041-e5a24acdb7ec">

<parm name="organization" value="globalcorp123" type="String"/>

</characteristic>
- Click Save and Publish
Auto-Launch App - Two Step Process
If devices are locked-down in a "kiosk mode" then the launch command may not get through. However, you should be able to temporarily whitelist the 7SIGNAL app, push the launch intent, then remove from the whitelist if you do not want your users to see the app.
- Go to DEVICES → Provisioning → Components → Files/Actions → ADD FILES/ACTIONS
- Select Android when prompted for the operating system.
- On the General tab, give it the name 7SIGNAL Mobile Eye Auto Start
- Go to the Manifest tab, the Action to Perform is Run Intent. Copy and paste the command line to run below.
mode=explicit,broadcast=false,action=android.intent.action.MAIN,package=com.sevensignal.MobileEyeEnt,class=com.sevensignal.mobileeyeent.ui.view.MainActivity
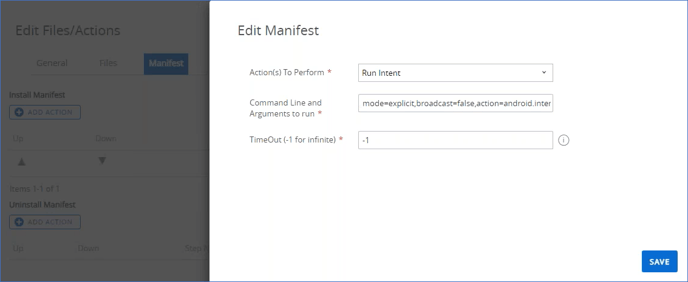
- Click Save when finished.
Now the second part where we use this newly created action to create a product. Products bundle provisioning components together in Workspace ONE and then can be assigned to groups of devices.
- Go to DEVICES → Provisioning → Product List View → ADD PRODUCT
- Select Android when prompted for the operating system.
- On the General tab, give it the name 7SIGNAL Mobile Eye Product and select the groups of devices that will use this product (called Smart Groups).
- On the Manifest tab, click Add.
- The Action to Perform is File/Action - Install
- For Files/Actions, select 7SIGNAL Mobile Eye Auto Start (you just created this)
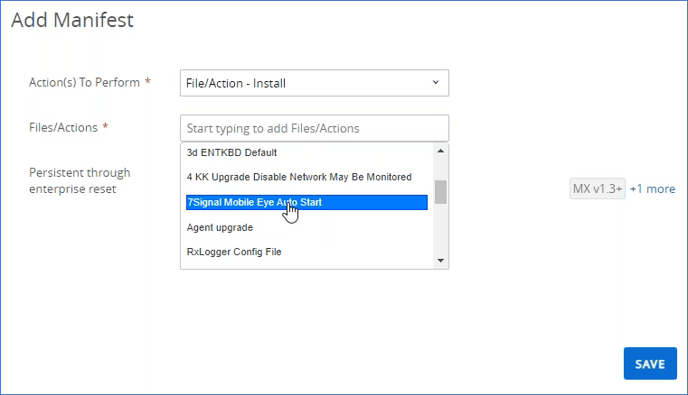
- Click Save when finished.
- If the Mobile Eye app does not start after deployment on some or all devices, then you may need to reprocess the action again. This is somewhat common.
- Go to Go to DEVICES → Provisioning → Product List View
- For the Mobile Eye product, click on the the number, indicating the quantity of devices that are "Compliant" or "In Process" or "Failed".
- When the list of devices appears, select the ones where Mobile Eye did not start.
- Then click the FORCE REPROCESS button.
- After pushing a new version of Mobile Eye to your devices, remember to perform this step again, to start the app on your devices.
Note on Running App After Install
There are some MDM/EMM solutions that do not have the capability that lets you to automatically launch the application after it’s been pushed to the device, such as Microsoft Endpoint Manager (inTune).
However, if your MDM/EMM system does not support this functionality, then you will need to launch the app manually or remotely. Once launched, Mobile Eye will run as a service in the background and should always restart itself after a device reboot.
No Connection to Google Play
While an APK version of Mobile Eye is available through 7SIGNAL, it is not a recommended method of deployment because it does not support the Managed Configuration features.
JSON Configuration
Some MDM/EMM systems require that you use a JSON editor for configuring parameters. If so, then please see below:

Only include the last option, "enable_support_controls" if log files are required for troubleshooting purposes.
Full List of Permissions
[{“packageName”:”com.sevensignal.MobileEyeEnt”,”permissions”:[{“name”:”android.permission.INTERNET”,”value”:”1″},{“name”:”android.permission.GET_ACCOUNTS”,”value”:”1″},{“name”:”android.permission.ACCESS_NETWORK_STATE”,”value”:”1″},{“name”:”android.permission.READ_PHONE_STATE”,”value”:”1″},{“name”:”android.permission.WRITE_EXTERNAL_STORAGE”,”value”:”1″},{“name”:”android.permission.FOREGROUND_SERVICE”,”value”:1″},
{“name”:”android.permission.ACCESS_BACKGROUND_LOCATION”,”value”:1″},
{“name”:”android.permission.ACCESS_FINE_LOCATION”,”value”:”1″},{“name”:”android.permission.ACCESS_WIFI_STATE”,”value”:”1″},{“name”:”android.permission.CHANGE_WIFI_STATE”,”value”:”1″},{“name”:”android.permission.WAKE_LOCK”,”value”:”1″},{“name”:”android.permission.RECEIVE_BOOT_COMPLETED”,”value”:”1″}]}]
Activate Licenses
After Mobile Eye is successfully installed on any device, go to Configuration > Licenses > Unassigned to find it. Check the box to the left, then click the Activate button. Within 5 or 10 minutes you should see your first data points for your device.