
After Mobile Eye is successfully installed on any device, go to Configuration > Licenses > Unassigned to find it. Check the box to the left, then click the Activate button. Within 5 or 10 minutes you should see your first data points for your device.
Red Hat Enterprise and Ubuntu
7SIGNAL Mobile Eye is compatible with x86 chips, Debian 10 and up, Ubuntu 20 and up, as well as Red Hat Enterprise Linux and CentOS 7.
You must be logged into Mobile Eye to obtain the software.
Once logged in, go to the Downloads link along the left navigation bar. You will download a PDF document that contains command line instructions for installing the software.
Certificates
Mobile Eye is expecting the root certificate store to be in JKS format and not PKCS12 format. A trusted SSL certificate (public key only) can be converted to JKS format easily with the use of the keytool command supplied in the OpenJDK package.
IGEL OS
You will obtain the 7SIGNAL profile for IGEL from 7SIGNAL Customer Support then unzip the file to a local directory. It contains the following files:
- 7SIGNAL-custom-profile-template.xml
- 7SIGNAL-Mobile-Eye.tar.bz2
- 7SIGNAL.inf
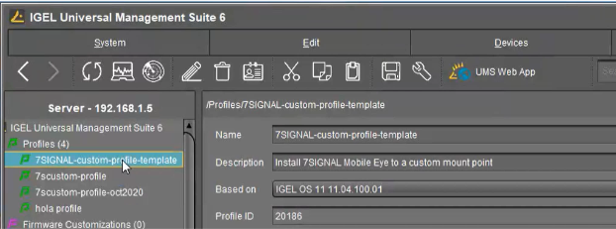
From the IGEL Universal Management Suite (UMS), go to System > Import > Import Profiles and select 7SIGNAL-custom-profile-template.xml. Upon successful import, it will appear in the Profiles section of the UMS.
Next, right-click Files along the left navigation pane and select New File.
Add the 7SIGNAL.inf file and then the 7SIGNAL-Mobile-Eye.tar.bz2 file to the IGEL UMS.
Then, go back to Profiles and double-click the 7SIGNAL-custom-profile-template to configure it. Go to Configuration > System > Firmware Customization > Custom Partition > Partition.
Under Partition Parameters...
- The value of ORGID (Organization ID) should be what has been assign to you by 7SIGNAL. This represents your database tenant in the cloud.
- The SERVER parameter should equal production.
- The CERTPATH parameter should match where SSL certificates are located, for example /etc/ssl/xxx/yourCertFile
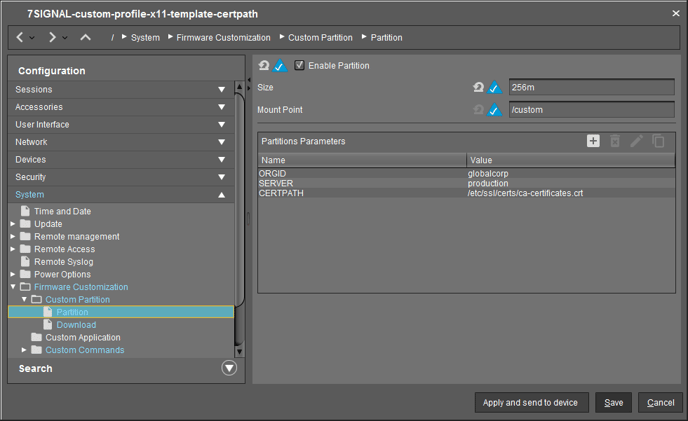
After modifying these values and clicking the Save button, you will click-and-drag the 7SIGNAL-custom-profile-template to your device. Select ‘Now‘ when asked when you want these changes to take effect.
It will take a few minutes for the profile to install on the device. When complete, the device must be rebooted. Right-click on the device and select Reboot. If the device is connected to Wi-Fi, then it should report data to the Mobile Eye cloud within several minutes.
HP ThinPro OS
You will download the 7SIGNAL profile for HP ThinPro from the Downloads area in Mobile Eye and unzip the file to a local directory. It contains the following files:
- 7SIGNAL_configure_mobile_eye.sh
- 7SIGNAL_deploy_package.xml
- 7SIGNAL_mobile_eye_restart.sh
- 7SIGNAL_restart_command.xml
- 7SIGNAL-Mobile-Eye.tar.gz
From the HP Device Manager, you will create two tasks.
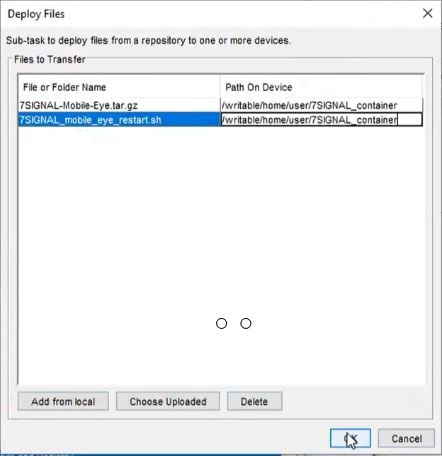
- Go to Task Templates > _File and Registry > Add
- In the Sub-Task Chooser window, select Deploy Files
- From your local directory select 7SIGNAL-Mobile-Eye.tar.gz
- After adding this file, click ‘Add from local’ again and select the 7SIGNAL_mobile_eye_restart.sh file
Next, specify the paths for these two files. In the ‘Path on Device’ field, add the following path /writable/home/user/7SIGNAL_container.
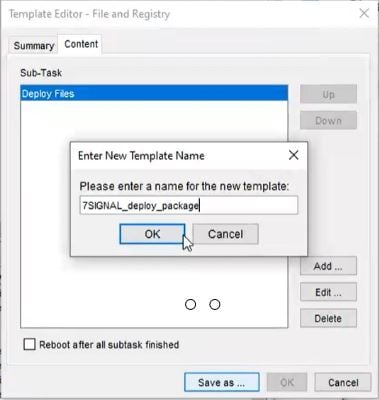
Next, in the ‘Template Editor – File and Registry‘ window, click Save as… and when it asks for Template Name, type 7SIGNAL_deploy_package and click OK.
You should see the data transfer from the repository into the HP Device Manager.
- When complete, click ‘Generate’ to create the deployment package.
- Go to the Device Tree, right-click on your device, click Send Task…
- In the Template Chooser, in the File and Registry category, select the 7SIGNAL_deploy_package and click Next, then click OK.
The next step is to configure the package with your unique Organization ID. In the HP Device Manager…
- Go to Task Templates > _File and Registry > Add
- In the Sub-Task Chooser window, select Script and click OK
- When prompted for the contents of the script, go to your local directory and open the 7SIGNAL_configure_mobile_eye.sh file
- Copy and paste the entire script into the Content area (see below)
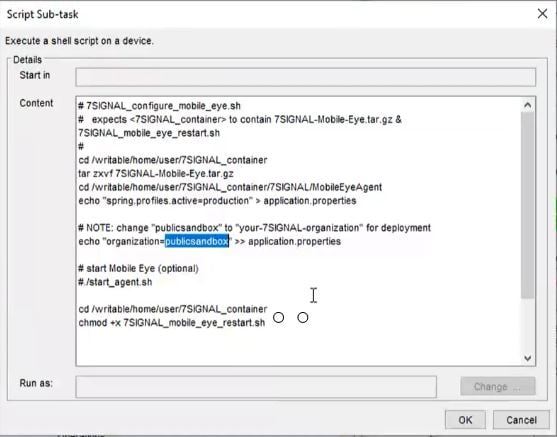
Halfway down the script, change the organization parameter from ‘publicsandbox‘ to your specific Organization ID you received from 7SIGNAL in your welcome email. Click OK when finished.
Next, in the ‘Template Editor – File and Registry‘ window, click Save as… and when it asks for Template Name, type 7SIGNAL_confire_script and click OK.
- When complete, click ‘OK’
- Go to the Device Tree, right-click on your device, click Send Task…
- In the Template Chooser, in the File and Registry category, select the 7SIGNAL_configure_script and click Next, then click OK.
Now we will add a command so that if the device is rebooted, 7SIGNAL Mobile Eye will restart.
- Once again, go to Task Templates > _File and Registry > Add
- In the Sub-Task Chooser window, select Command and click OK
- Type into the command field… /writable/home/user/7SIGNAL_container/7SIGNAL_mobile_eye_restart.sh
- Set the Execute After Reboot field to Yes and click OK.
- In the ‘Template Editor – File and Registry‘ window, click Save as… and when it asks for Template Name, type 7SIGNAL_restart_command and click OK.
- The final step is to reboot the device. In the Device Tree, right-click the device and select Power Management > Reboot. If the device is connected to Wi-Fi, then it should report data to the Mobile Eye cloud within several minutes.