
Best Practices for Sensor Deployments
- Use site surveys and AP floor plans to identify where sensors should be placed.
- Sensors need good signal strength from APs to achieve reliable results.
- Avoid metallic surfaces, and no closer than 2 meters/6 feet from an AP.
- Place in the most centralized location to maximize the coverage of one sensor.
- For areas with high ceilings (> 5 meters/15 feet), install to same elevation as APs, or slightly below if possible.
- Use PoE 802.3at to power sensors, although 802.3at 30w is recommended.
- Mount sensor to the ceiling using mounting brackets provided.
- They may also be placed on top of furniture or shelves.
-
- If not mounted with fixed bracket, the sensor should not be moved during monitoring.
These mounting instructions describe the steps for mounting sensors to a suspended ceiling grid. Ceiling grid clips are used on a suspended ceiling and are included in the box with each sensor unit.
If you wish to test your sensors before mounting them, then please skip to the bottom of the page.
Model 7S6300
Assembly instructions for installing the 6300 in an Oberon NEMA enclosure may be found here.
The 6300 mounting kit contains 3 optional brackets. Two are clip-on suspended ceiling T-Bar mounting brackets for either 1” wide rails or 9/16” rails. The third bracket is for screw mounting to either a wall or to a solid ceiling. Furthermore, it may be used as a pole or mast mount by strapping it to the pole using the included tie wraps inserted through slots in the sides of the wall bracket.
Wall Mounting
The 7S6300 may be screw-mounted on a wall (or ceiling) using the wall bracket shown below with two Philips screws holding it in place.
Connect the Ethernet cable or other port wires to the port(s) and slide the unit downward
onto the wall bracket until it latches in place.
A third mounting bracket is included that fits 9/16” ceiling T-bars (as well as the 15/16” wider
T-bar bracket.
|
|
T-Bar Mounting
Two different sizes of T-Bar mounts are included, for 1 inch (15/16-inch) T-Bar, or 9/16-inch T-Bar. Twist and Snap the T-Bar bracket onto a suspended ceiling T-Bar at the desired location.
|
|
Plug in the network cable or other port cables and slide the unit onto the ceiling bracket until the latch clicks in place.
|
|
Ensure the Sensor is securely latched in place. The mounting is complete.
Model 6200
You may download these instructions here.
Assembly instructions for installing the 6200 in an Oberon NEMA enclosure are here.
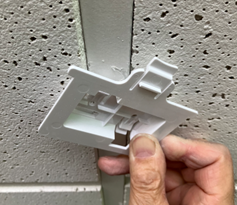
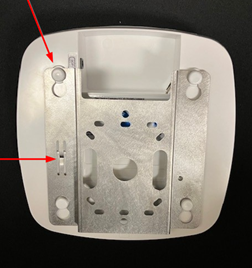
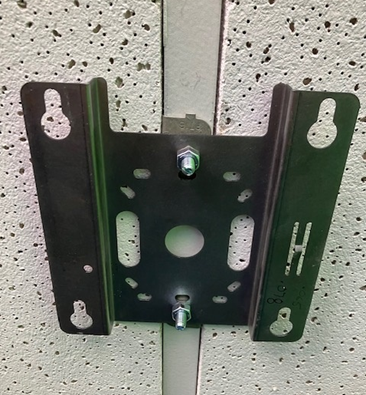
The sensor 6200 comes with the mounting bracket included. It is installed on the feet of the unit, along with two ceiling T-bar rail clips.
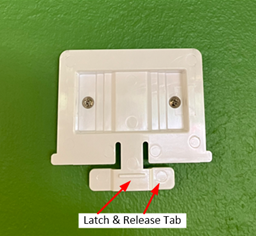
The top arrow points to where the one foot retains the bracket with its shoulder screw slid into teardrop hole in the bracket.
The side arrow points to the metal retention detent tab in the bracket. It will click over the retention bar in the plastic bottom
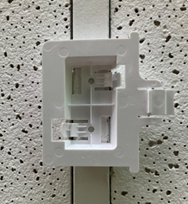
Remove the bracket from the unit in order to mount it to the wall or ceiling. Slide the bracket up until it allows the foot pads to drop through the bracket holes for removal.
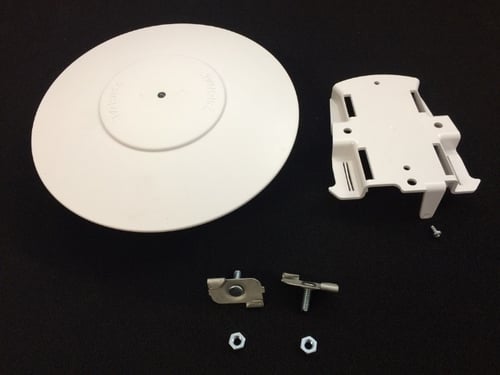
One ceiling mount option may be to screw the bracket to the ceiling or a beam. Alternatively, the bracket hole pattern can be lined up with holes in a ceiling work box similar to a light fixture workbox. Here, we’ll demonstrate mounting the bracket to a drop ceiling T-Bar rail using the too included twist clips and nuts.
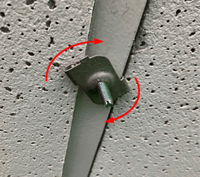
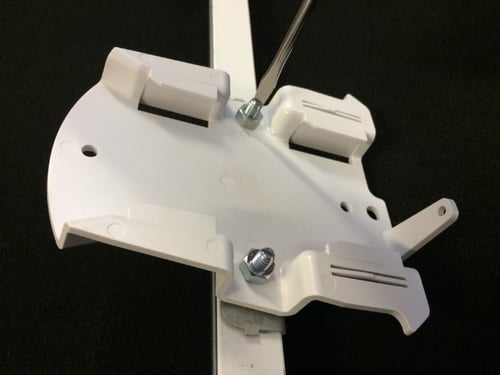
Install the two twist clips onto the ceiling T-Bar and tighten the screw flat head to the T-Bar as shown.
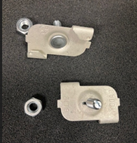
Install the bracket onto two twist clip ¼” studs using the included ¼” hex nuts as shown.
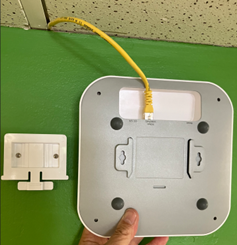
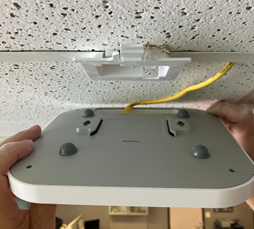
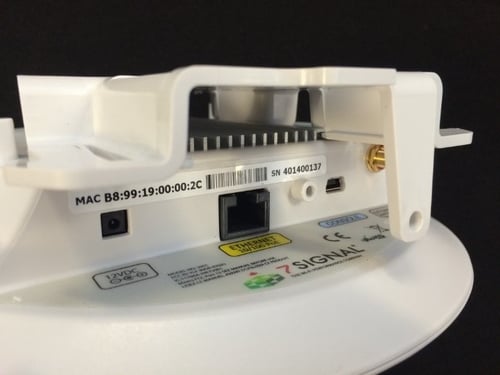
Plug in the Ethernet cable and other cables as required before installing the unit on the bracket.
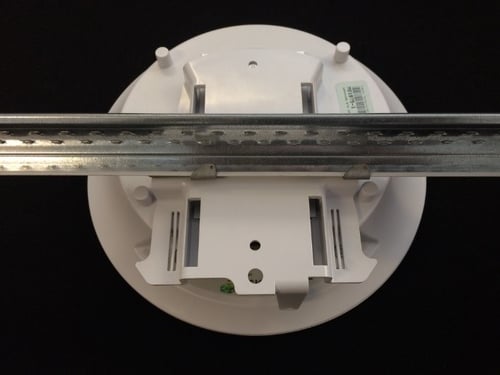
Line up the four shoulder screw-feet with the four large openings in the bracket and push all four feet straight up through the large holes in the bracket.
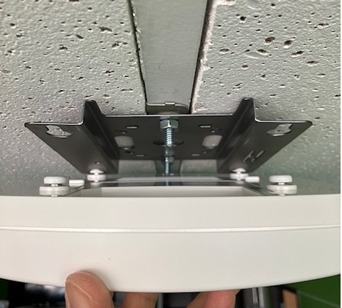
Then hold the bracket with one hand and slide the sensor 6000 forward with the other hand so that the foot screws go into the narrower slots in the bracket teardrop holes and capture the feet in the bracket.
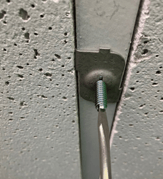
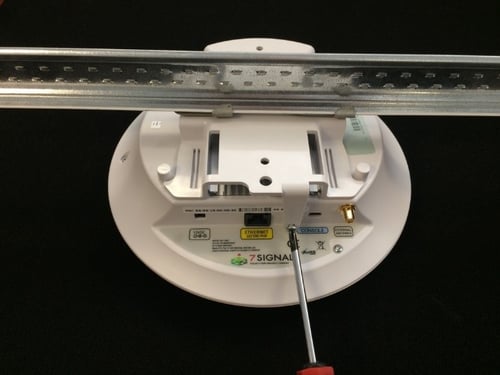
Verify the Retention Detent Tab on the bracket clicks over the plastic Retention Bar in the plastic housing as show in the side view close up below.
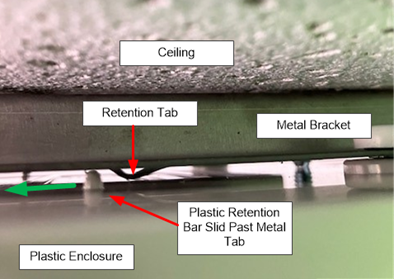
After hearing it snap in place, visually verify the unit is locked in place with the Plastic Retention Bar slid past the metal Retention Tab detent.
After the unit is installed, check it is secure by pulling back on the unit to insure it is locked and in place before leaving it.
Model 2100/2200
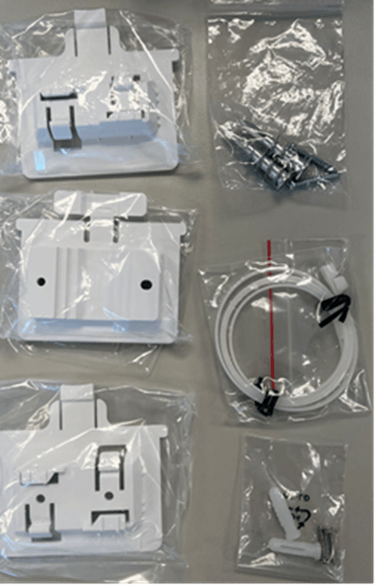
Included with the unit are (2) standard 1” clips with mounting screws, nuts, along with securing screw and mounting bracket.
Step 1
Add two ceiling grip clips with the nuts to the mounting bracket.

Step 2
Mount the bracket to the rail and tighten it with a screwdriver and 7/16” wrench.
Step 3
Slide the sensor unit to the mounting bracket by using the edges of the heat sink.
Step 4
Push and slide the unit gently until it locks into place with a “snap”.
Step 5
Use the securing screw to secure unit in place.
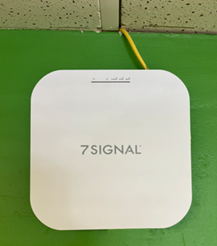
Power and Getting on the Network
sensors require standard Power over Ethernet (802.3af, 15.4w) although 802.3at 30w is recommended, or an Ethernet plus AC power adapter. Upon plugging them in and powering them up you will see a blue blinking light on the unit.
When using "over-the-air" mode, with no Ethernet cable, sensors may use a 12v power adapter. Below are links to examples.
StarTech.com DC Power Adapter - 12V, 2A - Universal Replacement Power Adapter
C13 AC DC Adapter 12v 2a Power Adapter
The sensor is configured for DHCP and will automatically connect to the Sapphire Cloud and register itself to your account, so long as redirector.7signal.com is not blocked by your firewall, or TCP ports 7799 and 7800. The connection to the cloud may be verified by a 7SIGNAL Engineer.