Blog

7SIGNAL engineers utilize Wireshark for improved data analysis to understand the root cause of Wi-Fi issues. This Wireshark tutorial, Wireshark for Wi-Fi, hosted by Jim Vajda, 7SIGNAL’s Chief Wireless Officer, describes this software and how to use it as a Wi-Fi network.
What is Wireshark?
Wireshark is a wireless network monitoring tool for wireless engineers that serves as a protocol network analyzer, radio frequency troubleshooting tool, and for ethernet (PoE), among other applications. Wireshark can be useful for layer 1 and 2 unencrypted data and routing, switching, and firewall issues. The newest release is version 4, which contains added 802.11ax decoding capability.
Wireshark helps wireless engineers monitor networks with a simple view of packet data and other Wi-Fi metrics. It’s free, open-source, downloadable software. See Wireshark.com.
Wireshark helps you read and understand clear text sent in Wi-Fi packets. It helps describe RF measurements and unencrypted protocols to enable a complete description of the activity in each layer.
A common belief is that packet capture (PCAP) provides the real source of truth. It’s important to note that’s not always the case. When doing PCAP and protocol analysis, you have to be just as concerned with the things that aren’t captured in the PCAP as what is captured. Sometimes what’s missing tells more of the story than what’s there, so it’s not recommended to emphasize what you view in packet captures.
With a default configuration and raw bytes, Wireshark can initially seem intimidating. It helps uncover the hidden language of Wi-Fi. Configuring Wireshark for Wi-Fi is helpful with data that can be organized and managed to obtain a visual indication of packets.
How to build a Wireshark Wi-Fi configuration
Packets can be differentiated by color for categorizing data, control, management, action, and retries. MetaGeek has created a cleaned-up profile for Wi-Fi with a helpful color scheme that 7SIGNAL utilizes and customizes. Wireshark has many different colors, layouts, columns, filters, and customizable I/O graphs to view and use, depending on tracking and analysis needs. The following are configurations for the layer-one portion.
1. Colors and filters
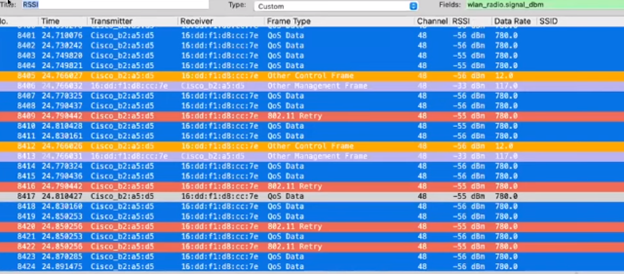
The MetaGeek color scheme helps you view information more clearly, instead of looking at everything in a table or spreadsheet format with lots of raw bytes. You can view each frame type, where they are probing, and where data is transmitted based on color.
Go to Preferences and then Appearance to customize your view.
More vertical space is recommended for packet viewing.
The next step is configuring the view based on your preference. This allows you to manipulate colors to make data stand out, create new columns, and filter data. Simply right-click on data to create a new color or column.
For example, if you want 802.11 retries to stand out, you can change the color to red to view those retries clearly, especially if there are many. Wireshark might show a corrupted frame incorrectly because there was an issue with the integrity of the data if a retry frame was corrupted. If you can identify a retry, you may be able to deduce that Wireshark is misinterpreting it.
Filters allow you to change the view to see only one type of packet or piece of information, just as when filtering a spreadsheet.
2. Helpful columns
Creating new columns should not be a one-and-done process. Depending on what you’re troubleshooting, it’s helpful to know how to do it quickly if you frequently disable and enable columns.
You may also add columns to your Wi-Fi view for more detail. The packet contains data groupings such as RF info, signal strength (RSSI – must be set up), data rates, modulation, and more. The 802.11 radio information is mostly physical-layer data.
For example, if you wish to add a signal strength column to your view, go into the radio information grouping and right-click on signal strength to add that column, for instance, “RSSI.” Short names are better, as they take up less page real estate. You can see immediately if the RSSI is low, which may mean the bits weren’t decoded correctly when captured. This information is useful in many different contexts, including RF troubleshooting.

MCS is also captured in the 802.11 radio information area. Adding an MCS column will allow you to see the MCS value quickly. MCS is a much simpler measure to consider for an overview than raw data. MCS is much more intuitive in terms of occurrence than the data rate.
Wireshark is unique because it captures Fi-specific MCS values. You may have one column for VHT MCS, which is 802.11ac. Other columns have to account for HT (802.11n) and HE (802.11ax) MCS values. Users can toggle between columns. It typically is not useful for all three columns to be enabled.
Wireshark also provides data around frame aggregation and frame timing. For instance, you can create an A-MPDU ID (AMPDU aggregate) column to track the changing number, frame aggregation occurrence, and what frames were transmitted together. For simplicity, you can incorporate an A-MPDU checkbox, and ID numbers can be viewed if required.
A PPDU (Physical Layer Protocol Data Unit) column, which could be named payload, describes the frame type. Most are MSDUs (the data payload containing the IP packet plus some LLC data), a standard frame, but you may see some A-MSDUs. It’s helpful to know this when working with frame aggregation and multi-user environments.
You can turn columns on/off according to your ability to view the data. The built-in information field is dynamic, showing the field type and when it was encrypted. Wireshark will illustrate a summary of the frames.
Wireshark also includes a built-in information field that summarizes the frame and how much was unencrypted, depending on its type.
Finally, you can view all your columns and other components in Preferences instead of right-clicking to make changes.
3. Timing fields
Wireshark also contains good-timing Wi-Fi fields. Duration is particularly useful, but it’s easy to misinterpret this. The duration field in layer one illustrates the time the frame took to be received in microseconds. A new column can be created, airtime, to show this. *NOTE: The duration field in the layer-two header is NOT the same.
A different duration field in the layer-two header in the 802.11 standard duration field can be renamed and should be a column. It’s a multiple-use field for duration value or associated ID, depending on the context. It sets the navigation timer for everyone who hears the frame.
You can calculate additional wait time after this frame is transmitted before the transmission opportunity (TXOP) is over or if the expected interframe spaces (IFSs) and expected acknowledgments (ACKs) are transmitted. *This duration field is not the duration in airtime of the current frame being transmitted, like the layer-one duration field, but it is most useful for many troubleshooting requests.
Wireshark uses built-in filters that can be accessed by right-clicking an address to apply it as such under Prepares filter. NOTE: A user can right-click anything in Wireshark.
Layers two and three
Wireshark uses IFS to indicate how much empty time exists between frames. If the sequence number under the Mac header in layer two is turned on, it shows unique aggregated frames. There may not be much data, as in a voice call (AMPDU), but if the sequence number hasn’t been incremented, it’s useful when looking at a block acknowledgment because it indicates the starting sequence and the number of the string of frames acknowledged. It also shows the QOS (quality of service) layer access category.
The priority layer-two access category shows multi-media (WMM) and QOS, prioritizing data packets from different applications.
The layer-three header shows the DSCP (Differentiated Services Code Point), level three QOS, and exactly what QOS is tagging in the DSCP used, usually translated into a WMM tag, which network devices use to pinpoint higher or lower traffic priority.
Views may be blank if there’s no multi-user traffic when looking to see if OFDMA (Orthogonal frequency-division multiple access) has occurred in your PCAP. This may be difficult to decipher, but using filters, a user can see if any frames were captured around OFDMA. There’s usually some mapping, so if no DSCP values show, it’s understood why the WMM is set to best effort.
Under Preferences, users can define things arbitrarily (view or not view data captured). No right-clicking is required to show information columns and view built-ins. Canned filters are on the right. If a user doesn’t need to see everything, use hide management to close some from view.
7SIGNAL understands the language of Wi-Fi
7SIGNAL knows just how impactful a tool like Wireshark can be for wireless engineers. We use it to get to the bottom of any Wi-Fi issue and continuously monitor how data packets are transmitted.
Learn more about how 7SIGNAL can increase the visibility of your entire wireless network with our sensors, Mobile Eye® and Sapphire Eye®.
7SIGNAL® is the leader in wireless experience monitoring, providing insight into wireless networks and control over Wi-Fi performance so businesses and organizations can thrive. Our cloud-based wireless network monitoring platform continually tests and measures Wi-Fi performance at the edges of the network, enabling fast solutions to digital experience issues and stronger connections for mission-critical users, devices, and applications. Learn more at www.7signal.com.